SOCIAL MEDIA

Monday, 29 February 2016

How To: Gel Nail Extensions

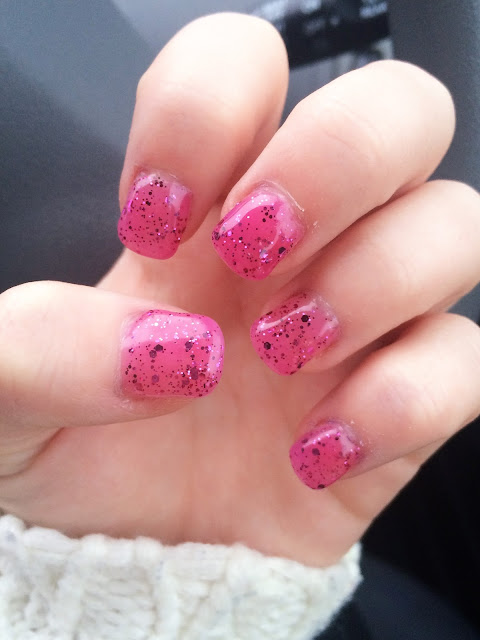
I am qualified in doing gel nail extensions and I have been questioned a few times on how I do them. So, today's post is on how to do your very own gel nail extensions. You will obviously need your very own UV/LED lamp, gels and simple nail tools. I created pink sparkly nails. I love both pink and sparkles so why not combine them!?

gel nail extensions


1. Start by pushing down and trimming your cuticles. Then, file your natural nails just to give them a simple shape and clean up.

2. Measure the tips against your natural nails to make sure they're the same size. The curve on the tip needs to measure against the top of your natural nail. Make sure the tip is wide enough for your nail. E.g if the sides of the tip are overlapping onto your skin, you'll need a smaller sized tip. File the sides of the tip if you're in between sizes.

3. Once measuring all of the nails, put the tips aside and buff the natural nails to remove the natural shine.

4. Apply nail glue along the bottom of the tip and press firmly on to the nail, measuring the curve on the tip with the top of your natural nail. There should be a gap between the cuticle and the bottom of the tip.


5. Once all of the tips are stuck on, use the nail tip cutters to cut the extensions. Cut to the length required.

how to do gel nail extensions

6. File your nail extensions to the shape you would like. Then blend in the bottom of the tip with your natural nail by using a curved nail file to get rid of that 'ridge'.

how to do nail extensions

7. Next, apply some building gel to make your extensions harder and stronger. This makes them less breakable. Cure them under a UV/LED lamp depending on which brand gel you're using. Also, based on the brand of gel you're using, check the cure time - it may take from 30 seconds to 3 minutes.

8. After your building gel has cured, wipe your nails over with finishing wipe to remove the excess gel.

step by step gel nail extensions

9. Buff over the nails and apply your gel colour. Again, depending on the brand of gel you're using check how many coats you'll need to apply, this should be on the bottle. After curing however many coats of the gel, always use finishing wipe.

10. Then, apply your top coat to add extra shine to your nails, cure, go over with the finishing wipe and your gorgeous nails are complete!


What I Used:


Thursday, 25 February 2016

Urban Decay Eyeshadow Primer Potion

Don't you just love trying out new eyeshadow primers? I most certainly do. For Christmas, I luckily received the Naked 3 palette. I didn't realise until a few days after using the palette that there was a little pocket of different primers in the box.

urban decay primer potion

urban decay primers

urban decay primers


ORIGINAL
"This undercover wonder works invisibly to keep colour in place"


urban decay original primer
Ok so lets be honest, I accidentally used up WAY too much of this! Oops.

This primer goes on invisibly and makes the eyeshadow last all day without creasing. The vibrancy stayed constant throughout the day too. It's a very creamy consistency so it was very easy to work with.
Would I buy this? Yes


SIN
"Just a dab of this shimmering formula prevents fading and creasing"

urban decay sin primer

This was much more shimmery than I expected. Once applied, it wasn't as bad as I thought it was going to be. I also created a very shimmery eye look so that worked well with the primer. My eyeshadow lasted all day without creasing and fading.
Would I buy this? Yes


EDEN
"This nude matte formula preps lids and prevents shadow meltdown"

urban decay eden primer

I found the consistency of this much harder to work with than any of the other primers. It went on invisibly which I was pleased about. Although, the eyeshadow did fade throughout the day.
Would I buy this? No


ANTI-AGING
"Makes shadow last AND in an 8 week clinical study: 100% of participants had a measureable improvement in the appearance of fine lines, 100% had measurably brighter skin, 97% had a measurable improvement in radiance and clarity.

urban decay anti aging primer

The consistency was very creamy and easy to work with. My eyeshadow lasted a full twelve hours. I obviously haven't been using the primer long enough to notice a difference of my skin. This probably may have been more noticeable on older skin.
Would I buy this? Yes


Bloglovin | Twitter | Instagram
Saturday, 20 February 2016

Urban Decay Naked 3 Palette

naked 3 palette

naked 3 palette review

naked 3 palette urban decay

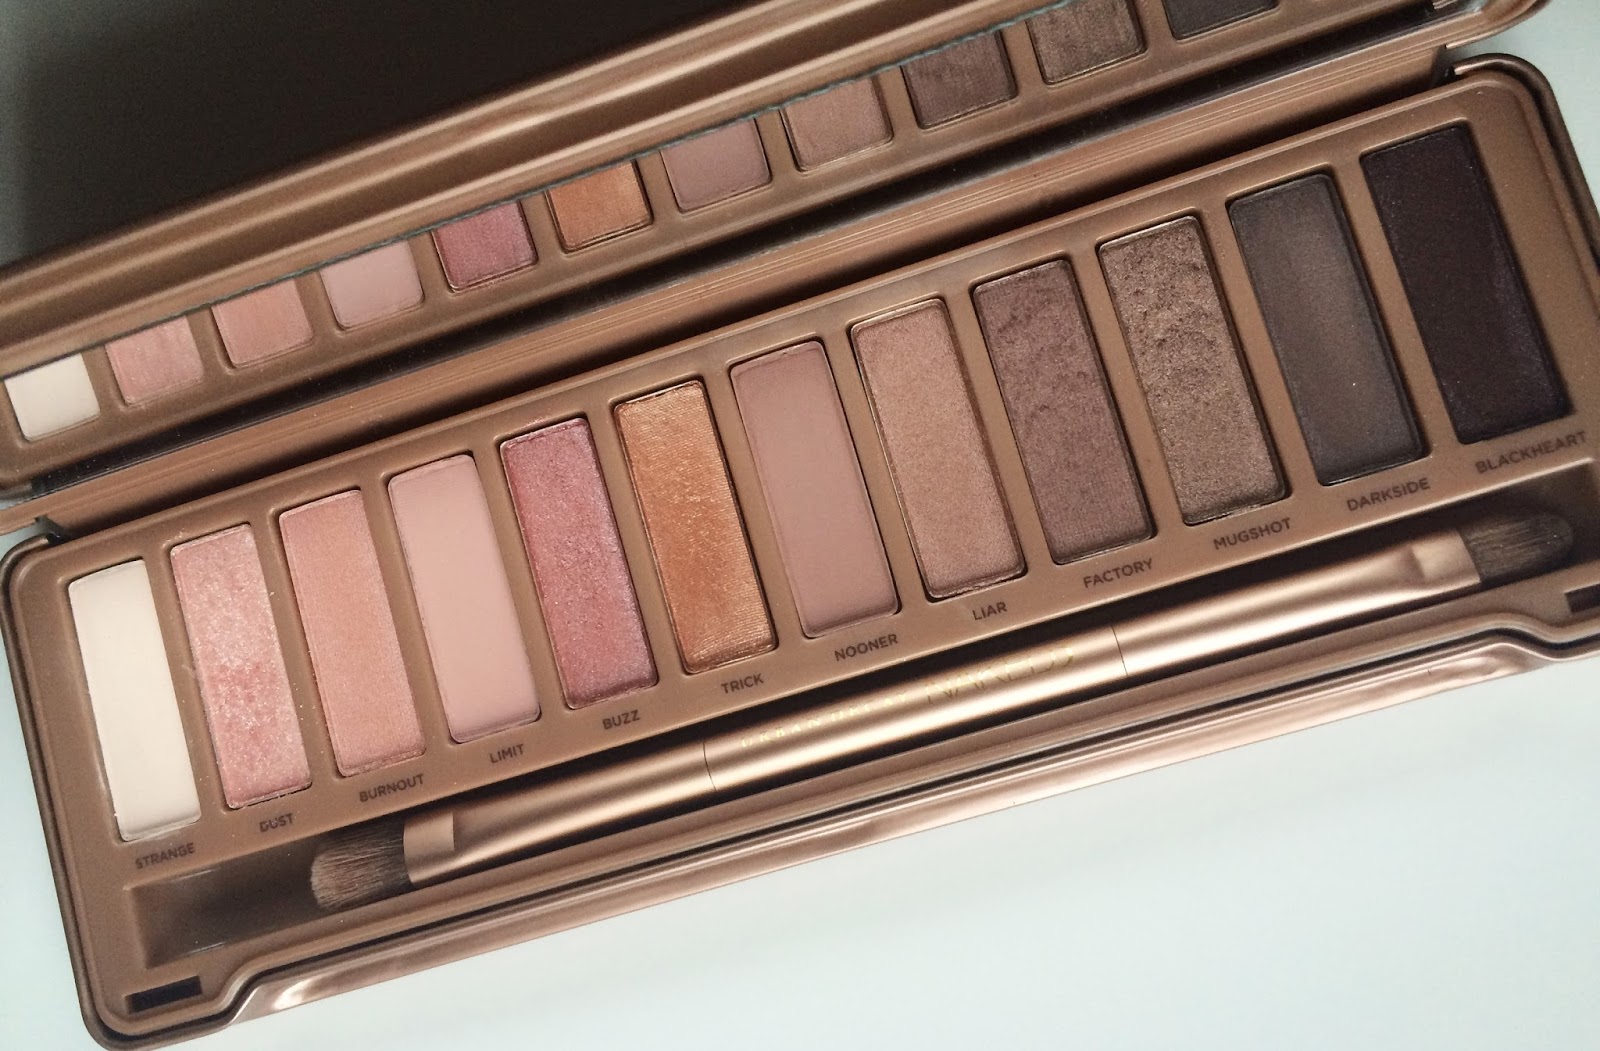
I have finally jumped on the bandwagon to own this beautiful palette by Urban Decay. I have never owned anything from Urban Decay until now, and I must say that I am impressed! After falling in love with all of the naked palettes, I chose this one. Included with the palette, I got four eye primer samples. Original, sin, eden and anti-aging. I will be posting a separate post on this, so keep your eyes peeled! There is also a dual ended brush included in the palette. The fluffier side of the brush is great at blending out the eyeshadow and the other side picks up just the right amount of eyeshadow. Overall, I really love this brush and use it all the time.

This is a very pink themed palette. I'm not usually a huge lover for pink eyeshadows as I have such pale skin but I thought I'd give it a go and I love it! First of all, I'm going to mention that the pigmentation is sky-high. I've never competed with pigmentation as good as this!

naked 3 palette swatches
Without Flash

naked 3 swatches
With Flash

All of the first six shades are just pretty much pink. Strange is a very light matte shade which could be perfect for a base colour. Trick is a very hard shadow to apply, I had to keep going back to it quite a few times for it to actually show up on my skin. As you can see, some shades out of these six have better pigmentation than the others.

naked 3 palette swatches
Without Flash

naked 3 eyeshadow swatches
With Flash

These last six shades are without a doubt my favourites in the palette. Nooner is a little on the pinker side of the scale and it's a nice warm matte shade. Factory has been very popular in my everyday makeup looks, I think my love for this shade is excessive. Just take a look at blackheart, isn't it just so beautiful? I love the purple shimmery tinge, it would be perfect for that smokey eye look you'd go for.

I have been loving trying out different makeup looks with this palette. Let me know if you would like to see any.

Do you own a Naked palette?


Bloglovin | Twitter | Instagram
Monday, 15 February 2016

Hair Do's and Don'ts*

I am so happy to be collaborating with Madison Reed on this post. As I am a hairdresser and have had some experience in the industry, I know what is right and what is wrong for your hair.
Take some advice from us and take notes of the do's and don'ts for your hair:


DON'T use box dye to colour your hair. Go to the salon or go to a trade store and buy some professional branded colour. Paradye (Paraphenylenediamine) is an ingredient in many box dyes which can easily cause allergic reactions. I have attached two articles to this post which you can learn from. Also, Schwarzkopf XXL Live is the worst hair dye you could ever use. It has metallic salts in it, which could cause your hair to break, fizz etc. If you would like to colour your hair after using XXL Live, you could probably face your hair falling out.

DO make sure that you have a skin test 48 hours before colouring your hair. This should happen every single time, whether you use the same hair colour or not. You could easily have/produce an allergic reaction to anything.

DON'T wash your hair everyday, it strips out the natural oils. My mum is so guilty for this. It's actually good to have greasy hair for a few days, you know.

DO use heat protector. Whether you're drying your hair, straightening, curling or using any other heated styling equipment. Also use it in the summer months or when you're in a hot country. The sun dries my hair out like crazy!

DON'T brush your hair whilst it's wet. This is a huge NO NO. This can lead to breakage which causes those annoying shorter hairs.

DO use a wide toothed/detangling comb on your wet hair. And start from the ends and work your way up to the roots.


hair dos and donts

I hope you've learnt some new things about caring for your hair. Do you admit to any of the hair don'ts?
Take this very quick survey from Madison Reed to find your perfect hair colour!


Wednesday, 10 February 2016

Soft Rose Makeup | Valentines Day

Oh wow, I can't even believe that I'm writing this post. Realising that Valentines Day is this week, my mind has just clicked, how is it February already!? I have created a simple pink makeup look for Valentines Day. I have collaborated with Dena on this post, so make sure you go to her blog to check out her Valentines look too!

valentines day makeup

I applied my Maybelline Dream Satin Liquid foundation in 'Ivory', and then I concealed the areas that needed to be covered using the Natural Collection Cover-up Stick in 'Fair'. Even though the concealer stick breaks in half the majority of the time, it does its job and I absolutely love it! I set my face with the Rimmel London Stay Matte Pressed Powder in 'Peach Glow'.
I added some colour to my cheeks using Soap & Glory's Love at First Blush.

I then filled in my eyebrows using the New Cid Cosmetics Pencil and I used the Naked 3 Palette for my eyes. To make a start on the eyes, I used the shade 'Nooner' lightly dusting it in the crease of my lid and gently blending it out. I then went in with the shade 'Buzz' on the middle of my lid. Next, I used the shade 'Blackheart' on the outer corners. I lightly blended it in with 'Buzz'. 'Blackheart' was a very pigmented shade and I found it super hard to blend but it worked out fine. Lastly, I used the shade 'Strange' on the inner section of my lid and to highlight my brow bone. Can I just say that it's the perfect brow highlight! On my lower lash line, I applied a tad of 'Buzz'.

Then, I added Soap & Glory's Supercat Liner  to enhance my eye makeup. I then applied the beautiful 'Connie' lashes from Vintage Cosmetics. I applied some mascara to the bottom lashes and my top lashes to blend them in with the falsies.
The lip colour I chose to go with the eyes perfectly was L'Oréal Color Riche Lipliner in 'Bois de Rose'. This colour suits my skin tone so well, it's not too dark or too light.

pink valentines day makeup

What are your plans for Valentines day?
Before you go, you can follow Dena's blog here and her Twitter account here.


Bloglovin | Twitter | Instagram
Saturday, 6 February 2016

What to buy your loved one's this Valentines

valentines day gift guide

With Valentines Day just around the corner, I thought that I would create a gift guide to give you a few ideas on what to buy your loved ones. Me and my boyfriend don't usually bother with Valentines Day, we only get each other cards. But I found a few lovely gifts, for both him and her, which would be perfect to buy your loved ones this Valentines Day.


Mr Perfect Mug - £5.00 from Clintons

'Guess Who Loves You' Boofle - £10.00 from Clintons

'You're All I Need' Boxers - £4.00 from George at ASDA

Personalised Milk Chocolate Gift Tag - £1.50 from Thorntons

Bear wearing boxers - £10.00 from Clintons


Twelve Red Roses (or normal flowers) - It's a must...


Monday, 1 February 2016

Kiko Milano Wishlist

Kiko milano wishlist

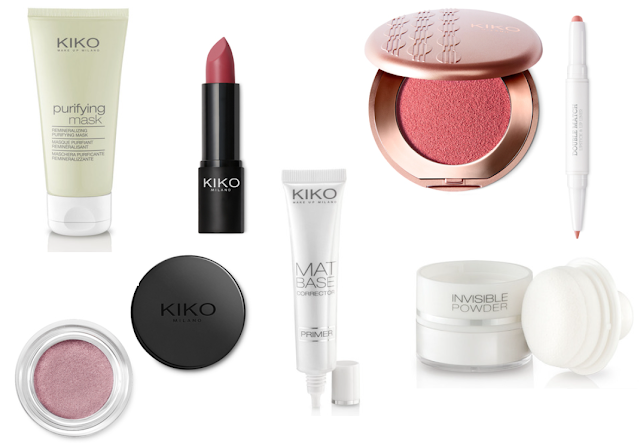
I have been very fond to try Kiko products for quite some time now. As soon as I checked out Kiko's website, I fell in love with all of the products, I wanted everything. The packaging is so neat and presentable, I just love the colour combinations on different products.

The first product that caught my eye was the purifying mask. Being honest with you, I didn't have a clue that Kiko Milano sold skin care. So I was extremely pleased when I found this, especially as it's a remineralising mask for combination to oily skin types. There's also other beauty masks to suit other skin types which is a must! With fantastic reviews, this primer is ideal for combination to oily skin which is perfect for me. I absolutely love trying out new primers and comparing them. I truly loved the look of the invisible powder to fix makeup. It's transparent and it's anti-shine which is fab for my oily skin!

I love this simple lipstick, precisely in the shade 'Marsala'. All of the other shades are beautiful too, but if I had to pick just one it would be this one. Another lip product I have my eye on is the double match lipstick and lipliner. It's a two in one, who would complain? The colour 'Cool Rose' itself is so pretty, it's a lovely nude pink, it's so me! To go with these lovely lip products, I've eyed up this gorgeous shimmery metallic eyeshadow. It's meant to be a creamy powder eyeshadow with a metallic look, which I loved the sound of! I just couldn't choose between the colours though. I couldn't leave Kiko without making space on my wishlist for blush. So lastly, I found a beautiful matte blush. I am quite pale but I think that this shade will go perfect with my skin tone.

Purifying Mask - £5.90
Smart Lipstick (926 Marsala) - £3.90
Rebel Bouncy Blush (02 Adorable Pink) - £4.90
Double Match Lipstick & Lipliner (01 Cool Rose) - £7.90
Invisible Powder - £11.90
Mat Base Corrector Primer - £8.90
Metallic Shine Eyeshadow (02 Absolutely Rose) - £3.40

Bloglovin | Twitter | Instagram